The Power of the ThreatQ Open Exchange API - Part 2
POSTED BY JULIAN DEFRONZOContinuing our series on the ThreatQ Open Exchange API, today’s topic will cover working Adversaries and Events.
You will need a valid Access Token to follow along. For a refresher on how to authenticate and obtain an Access Token, see the previous post in the series.
Working with Adversaries
The following examples are based around simple use cases for working with adversaries in the API.
Listing Adversaries
To retrieve a list of adversaries, use the /api/adversaries endpoint. This will return the basic data for each adversary in an array. In this case, we are limiting the results to five adversaries (Figure 1).
|
$ curl -k “https://$THREATQ_HOST/api/adversaries?limit=5” -H “Authorization: Bearer $ACCESS_TOKEN” { |
Figure 1: Retrieving a list of Adversaries
Querying for a Specific Adversary
In this example we want to query for the specific adversary, doubleflag, in our Threat Library. We also want the API to return additional information including the adversary’s sources, description, and attributes. We can use the /api/adversaries endpoint again, passing a name URL parameter with our search query and the values sources, description, and attributes in the with URL parameter (Figure 2).
|
$ curl -k “https://$THREATQ_HOST/api/adversaries?name=doubleflag&with=sources,description,attributes” -H “Authorization: Bearer $ACCESS_TOKEN” { … |
Figure 2: Querying for doubleflag with additional fields
Creating an Adversary
To create an adversary, we will first create a JSON file that will contain the basic adversary details: the adversary name and the source of the adversary. As in the authentication step above, we will create a JSON file to facilitate making the API call (Figure 3).
|
$ cat adversary.json { |
Figure 3: Adversary JSON file
With the JSON file created, we can create the adversary by making a POST to /api/adversaries (Figure 4).
|
curl -k -X POST “https://$THREATQ_HOST/api/adversaries” -H “Authorization: Bearer $ACCESS_TOKEN” -d@adversary.json { |
Figure 4: Creating an Adversary
To set the adversary’s description, we must make a POST to /api/adversaries/ADVERSARY_ID/description with the description value (Figure 5). The description value accepts HTML formatting.
|
curl -k -X POST “https://$THREATQ_HOST/api/adversaries/439/description” -H “Authorization: Bearer $ACCESS_TOKEN” -d ‘{“value”: “<p>Description</p>\n”}’ { |
Figure 5: Setting an Adversary description
Working with Events
The following examples are based around simple use cases for working with events in the API.
Listing Events
To retrieve a list of events, use the /api/events endpoint. This will return the basic data for each event in an array. In this case, we are limiting the results to five events (Figure 6).
|
$ curl -k “https://$THREATQ_HOST/api/events?limit=5” -H “Authorization: Bearer $ACCESS_TOKEN” { |
Figure 6: Retrieving a list of Events
Querying for a Specific Event
In this example we want to query for a specific event with the title RIG Exploit Kit in our Threat Library. We also want the API to return additional information including the adversary’s sources, description, and attributes. We can use the /api/events endpoint again, passing a title URL parameter with our search query and the values sources and attributes in the with URL parameter (Figure 7).
|
$ curl -k “https://$THREATQ_HOST/api/events?title=RIG%20Exploit%20Kit&with=sources,attributes” -H “Authorization: Bearer $ACCESS_TOKEN” { |
Figure 7: Querying for RIG Exploit Kit Event with additional fields
Creating an Event
To create an event, we will first create a JSON file that will contain the basic event details: the event title, event type, and the source of the event. As in the authentication step above, we will create a JSON file to facilitate making the API call (Figure 8).
|
cat event.json { |
Figure 8: Event JSON file
Note: You will need to ensure the event type already exists in your Threat Library. To do this you can navigate to ThreatQ Configuration > System Configurations > Event Types (Figure 9).
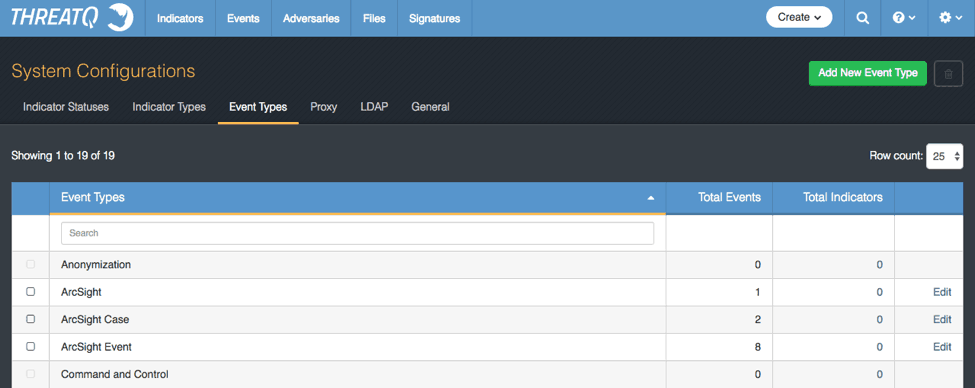
Figure 9: Configuring Event Types
With the JSON file created, we can create the adversary by making a POST to /api/events (Figure 10).
|
curl -k -X POST “https://$THREATQ_HOST/api/events” -H “Authorization: Bearer $ACCESS_TOKEN” -d@event.json { |
Figure 10: Creating an Event
The ThreatQ Open Exchange API is a powerful backend tool that provides flexibility in working with the data in the Threat Library. By using the API directly, you can manipulate and create new data in a way that works best with your workflows

0 Comments
Trackbacks/Pingbacks